
In all our years of being a 3D printer technical support team, we’ve had diverse experiences with different 3D printers. While some turned out fine, you can already guess that some experiences didn’t go so well. We realize that end users sometimes fall victim to purchasing 3d printers they eventually regret. That’s why we’ve decided to go on a testing spree to figure out which 3D printer works like magic and which ones would give lots of issues.
We conduct an Ender 3 V2 review in this article, highlighting our experience with this 3D printer. In other words, we’ll give you first-hand experience with this 3D printer so you’ll feel as though you are virtually using the 3D printers. We’ll be as plain and detail as possible with the benefits and downsides of this 3D printer, so you’ll make a clear and informed decision on whether or not you should still buy it.

CREALITY Official Ender 3 V2 3D Specifications
Before we dive into the essence of this 3D printer, let’s check out the specifications.
- Technology: FDM
- Dimensions: 475 x 470 x 620 mm
- Display: LCD color screen
- Filament diameter: 1.75 mm
- Connectivity: MicroSD card, USB
- Built-in camera: No
- Resume Print: Yes
- Bed leveling: Manual
- Compatible materials: PLA, ABS, PETG, TPU
- Feeder system: Bowden
- Max. build volume: 220 x 220 x 250 mm
- Closed print chamber: No
- Print bed: Heated
- Accuracy: 0.1 mm
- Max. print speed: 180 mm/s
- Layer height: 0.1 mm
- Extruder type: Single nozzle
- Max. heated bed temperature: 100 °C
- File types: STL, OBJ
- Operating system: Windows, Mac
- Mechanical arrangement: Cartesian-XZ-head
- Nozzle size: 0.4 mm
- Max. extruder temperature: 255 °C
Related: Creality CR-6 SE vs. Ender 3 v2
Ender 3 max vs Ender 3 v2
The Pros and Cons of the Product
Here, we’ll explore all the benefits and the downsides that you’ll experience while using this product. This part would help you decide if you should purchase this 3D printer.
The Pros of ENDER 3 V2
- Deploys ultra-silent feature for quiet printing.
- Built with a metal body that makes it durable and stable.
- Fosters high precision printing.
- Beginners would find it easy to use.
- It is aesthetically pleasing.
- Fast heat-up time.
- Comes semi-assembled, making it easy to assemble.
- You’ll find it easy to operate this 3D printer.
- Integrated power supply.
- Operates with color LCD.
- Has the “resume print” feature.
- Created with Heated carborundum glass plate.
The Cons of ENDER 3 V2
- Lacks filament sensor
- The bed leveling function is applied manually.
- Loading filament is hard work.
- Z-axis has only 1 motor.
- The interface is not touchscreen enabled.
- Heavier glass beds lead to ringing in prints.
- Printing with Nylon filament requires a different PTFE tube.
- It doesn’t have BL-touch.
After going through the pros and cons of the Ender 3 V2, you’ll realize that there seem to be quite a few reasons why you should consider investing in this 3D printer. There are also valid reasons that could discourage you from purchasing it. The tie-breaker here that should help you determine if you should opt for this printer is how you intend to use it. Nevertheless, the cons are not that much of a big deal. You can still make magic with this printer, especially as a hobbyist.
Ender 3 V2 Details
If you’re not fully convinced about this printer, let’s take you through the features it embodies.
What is the 3D printer like physically?
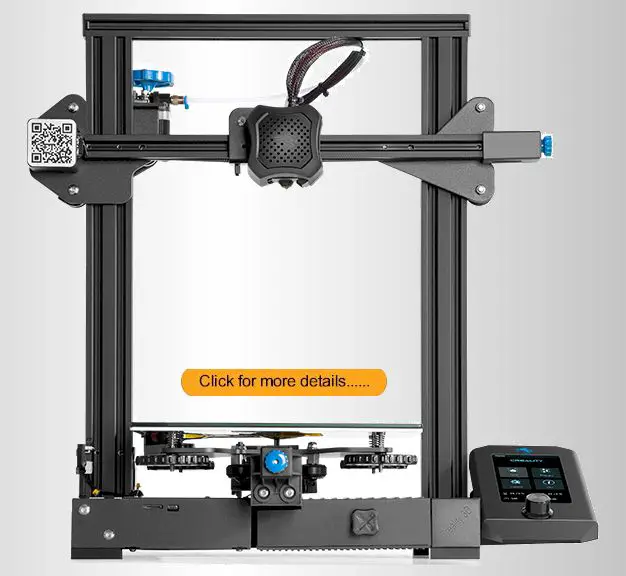
The design of the Ender 3 V2 is different from the previous models. Creality modified the design of this model to look a bit more beautiful and aesthetically pleasing to the eyes. For starters, they deployed high-quality frame material in building this 3D printer.
They ditched the box metal enclosure that previous models are known for as they remodeled this model to have plastic panels around it. These plastic panels contribute to their durability and stability.
The aluminium build plate that’s on the Ender 3 model was swapped for a glass plate on the Ender 3 V2.
How the 3D printer is used?
Although this printer looks professional, it doesn’t necessarily perform like a professional printer. Instead, it’s great for hobbyists. With quite a few upgrades, this printer is optimized for a fantastic performance. For starters, the glass plate allows you to freely remove your printed objects with ease off the bed.
When you’ve gotten the object you wish to print, simply fire on this printer, connect to your Laptop or computer via the various microSD or USB connectivity options. The best part is that this printer is compatible with both Windows OS and Mac OS.
It is fairly easy to operate as anyone, including newbies can print their desired objects themselves.
Ender 3 V2 Features and ratings
CREALITY Official Ender 3 V2 3D Printer Ratings
-
Design
-
Print Quality
-
Heat Speed
-
Color Screen
-
Glass Table Print Bed
-
Print Bed Leveling
-
Filament Loading
-
Resume Print
-
Setup
Design
Aside from the machine’s body that’s sheltered in a plastic box, the extruder is another part of this printer that’s made from plastic. They also converted the inlet into a metal insert whose work is to prevent the wear and tear of the extruder inlet.
More so, they built relocated the power supply to the base frame. It was also designed with ultra-quiet printer drivers to prevent noise. However, the opposite is the case. When we put it to use, we couldn’t help but realize how noisy the printer became in an instant, and that’s no thanks to the fan noise.
While people coming from outside might not hear the noise, those within the radius of the printer would testify about how disturbing the noise gets. However, when we paid close attention to the noise, we realized that the fan noise might be a symptom of wear. Hence, you might want to consider changing the printer’s fan to eliminate the noise and enjoy the ultra-silent feature. The fans you’ll need to replace include the electronics case fan, the cooling fan, and the hot end fan.
Print Quality
The print quality of this printer is very apt. It was designed with precision printing that leads to near perfection of your object. You only need to level the print bed manually. Once you do that carefully, feel free to print as many objects as possible. You don’t have to worry about any print failing in the process of printing a wide number of desired objects. It also works perfectly for any object size you wish to print, regardless of its complexity level.
To make printing easy, Creality added adhesion to the print bed to ensure that you can easily take off the 3D printed object once the temperature cools down. The only issue you might encounter with this printer is the position of the filament feed; it sits next to the lead spool. This problem is the same problem with Ender 3. Another downside to the print system is that the enlarged feed wheel doesn’t help with inserting a new filament. Nevertheless, it comes in handy when cleaning the hot end.
More so, the print speed is not perfect. It runs on average speed, just like with the previous models. The best print speed to print your objects for perfect detailing is 60mm. If that’s too slow for you, you can increase the speed to 100 or 120mm. But you should know that the higher the print speed, the lower the quality of your printed object.
Related: Elegoo Jupiter Review
Heat Speed
Another impressive feature of this printer is the heat-up speed. Creality listed fast heat-up speed as one of the features of this printer, and that piqued the interest of my team members and me. We wanted to know how fast the heat-up speed was and when we put it to the test, it heated the hot end and the print bed pretty fast.
We set a timer to be sure and realized that it took 3 mins and 4 secs to heat both the hot end to 200 degrees celsius and the printing bed to 60 degrees. When we tried to heat only the hot end to see if it would be any different, we realized that it only needed 2 mins and 8 secs to heat up.
Color Screen
Although Creality deploys a unique screen with a high-quality LCD color screen, it is still not entirely easy to operate, and here’s why. In a world where every screen is touchable, one could begin to wonder if Creality is trying to rebel against the touch screen culture that devices these days have. Their screen is not touch screen enabled, and you have to navigate through the features available through a click-wheel. Aside from that, the user interface is new and different from the previous models. Generally, this LCD screen is a mild diversion from the regular.
Glass Table Print Bed
In terms of the print bed, this model improves the previous model, especially the Ender 3Pro. This printer uses a tempered glass print bed that’s Carborundum coated. This feature is an amazing addition as it solves the filament accumulation problem that most 3D printers encounter with the ender 3Pro. It is part of what ensures you can easily remove your object from the print be after printing it. It also boosts the material adhesion on the print bed.
Print Bed Leveling
When it comes to leveling the print bed, Creality deploys the classic leveling style, the paper style. This method requires you to use 0.1mm thick paper to check if the distance between the nozzle and the print bed is perfect. Throw the paper in the distance you set between the nozzle and the print bed.
The distance is perfect if you feel friction when the paper moves. If not, consider adjusting the distance until you feel that friction. You’ll need to repeat the paper test on the four corners of the print bed where the turn screws sit on top to get the correct spacing. I warn you; although this process sounds easy to do, you’ll realize that it is not that easy.
You’ll need to subject the print bed, the nozzle, and the paper to the paper test a couple of times until you’re certain that the print bed leveling is correct. But first, you have to deactivate the motors of this printer. Then, please set it to the home position, and you’re good to go.
Filament Loading
You’ll most likely get frustrated with loading the filament on this printer. Unless you know how to work with the Bowden tube, you’d most likely get frustrated loading the filament as this printer uses the Bowden tube. When loading the filament, you might encounter one issue: it tends to flow out through the side rather than the end.
As a result, it deflects. Furthermore, you have the liberty of preheating the printer in two modes. The first one is for the PLA with the preferred setting of 200°C nozzles and 60°C for the print bed. The second mode is perfect for printing ABS with the best heat setting at 240°C for the nozzle and 70°C for the print bed.
Resume Print
This feature is common with hobby printers, which can be categorized under. Here’s how it works; when the power supply breaks down unexpectedly, this feature saves your progress so that once you restore the power supply to the printer, you won’t need to start from the beginning. Instead, you’ll continue from where you stopped as it saves your progress.
Setup
Setting up this printer is fairly easy, and that’s because most of the parts come pre-assembled, unlike some printers that’ll require you to put all the pieces together from scratch. You won’t need to worry about setting up some parts from scratch. These parts include the mainboard and the power supply, etc. You don’t need to start assembling these parts from scratch. However, there are certain parts we had to put together from scratch.
These parts include the filament holder, the display, the X-axis with printhead/ extruder, etc. We could easily put these pieces together because we’ve been doing this for as long as we can remember. So, we had our experience assembling 3D printers jump in for us. Unless you’ve had to assemble 3D printers before, we strictly advise that you reach out to a professional for help. While there are instructions in the manual, it would confuse you as a greenhorn.
Ender 3 V2 Alternatives
If you’re here. It probably means you’re not blown away by this printer. That’s okay. You can try out some of these alternatives.
- Creality Ender 3 Pro:
Although this printer comes before the Ender 3 V2, You’ll realize it still has some cool features. While the Ender 3 V2 has upgraded features, you’ll still benefit from this printer. Unlike the Ender 3 V2, this printer is built with Aluminium. It also heats fast, like the Ender 3 V2. one major benefit of owning this printer is how easy it is to level the print bed. It uses big leveling nuts to achieve the ease of leveling the bed.
- Artillery Genius:
If you’re particular about a good 3D printer that has a touchscreen, this printer is perfect for you. The screen is colorful, so you’ll enjoy messing around with the interface a lot. It consumes as much as 600watts of power and also fast heats. By design, this printer is also very durable and stable, and it offers the coveted resume print feature that every hobbyist looks for in a 3D printer.

Verdict
Compared to its predecessors, our Ender 3 V2 review revealed that this printer underwent a couple of upgrades that make it a more efficient printer compared to its predecessors. For starters, the enclosure for this model makes it great for using exotic filament materials, eliminating the fear of these filament wrapping. Although the Bowden extruder on this printer poses an issue, it is still generally a really good 3D printer for any hobbyist and professional.
Contents
